Thursday, December 3, 2009
Sunday, November 22, 2009
How Have I Missed This?

I found this on the Austin Area Birth Center site It is a beautiful birth center and Austin is very lucky to have it. Having been immersed in birth all these years, I'm amazed that I have never heard this poem before. I received a wonderful, touching note from a couple whose birth I was fortunate enough to attend and it again reinforced that I am so lucky to be able to do what I do. And this poem says it all.
A Poem: Being Born is Important
Being Born Is ImportantBeing born is important
You who have stood at the bedposts
and seen a mother on her high harvest day,
the day of the most golden of harvest moons for her.
You who have seen the new wet child
dried behind the ears,
swaddled in soft fresh garments,
pursing its lips and sending a groping mouth
toward the nipples where white milk is ready~
You who have seen this love’s payday
of wild toil and sweet agonizing~
You know being born is important.
You know nothing else was ever so important to you.
You understand the payday of love is so old,
So involved, so traced with the circles of the moon,
So cunning with the secrets of the salts of the blood~
It must be older than the moon, older than the salt.
~Carl Sandburg
Saturday, November 21, 2009
Mud, Glorious Mud
I've mentioned the Canelo Project before. It's a beautiful, inspiring place in the Canelo Hills of Southern Arizona. I was lucky enough to attend a workshop there a couple of years and learned what has allowed me to do what I've done with my home.
Tuesday, November 17, 2009
Post HomeTour Home Tour: And We're Walking, Walk...
There is no walking, walking in my house, only walking. It's not that big. But it makes it oh, so easy to maintain. While I love looking at the large houses I see online with lots of frou-frou, honestly, the first question is that pops in my brain: "Who is gonna dust that?" It's all beautiful, but I am a low-maintenance girl. I also can't stand The 3 Stooges because when they start throwing those pies around, I'm thinking, "And who will clean that up?" Just a little stroll through my psyche.

The sum total of my fall decor!
So I got a little highjacked from the Home Tour with my sewing for the Airstream, which is coming along nicely, thank you.
So, now we are in the hallway. The infamous border conceived to cover up the infamous drywall boo-boo. Fact is, the border now looks like it's always been there and I can't remember what the wall looked like before.


Watercolor by my friend Mark Johnson.
He and wife Bobbie are both talented artists.
And in this corner...the wall behind the kitchen-cabinet-turned-media-center-server-cabinet, used to be brown clay and it was just too much brown. So it became white and it was another excellent choice as it really brightened up the room. And yes, that is clay paint.

Then behind the sofa, I changed up the sofa table. The lamps (as old as the hills, from Target originally, but that's not where I got them) used to be in my bedroom and of course they used to be some other color. The white "legs" were on the wall behind the wood stove but but they just weren't happening there. So, now they're here.

Much better
And the sofa table itself used to be a coffee table. It had been used in our previous home but had no place here and was actually in the wood pile. I needed a very narrow sofa table, the top being the only part that would be visible. So I picked up a black aquarium stand for $3 at a church sale, cut down the coffee table top and attached it to the stand. Just what I needed!

Okey-dokey, it's 08:29 and my sewing machine is calling. Later...
Tuesday, November 10, 2009
Fabric shopping, couldn't you just go broke?
I went to my SAS Fabrics yesterday searching for some upholstery fabric to recover the dinette cushions in the Airstream. The lovely fawn-mauve cut velveteen is just not doing it for me this century. There are big "discussions" in the Airstream community regarding the pros and cons of keeping older models original or updating. Just like politics, there are 2 vocal sides to that isle. I have seen apoplexy over the issue of painting the cabinets. My POV, you pay for the gas to haul the thing around and you can tell me what to keep, until then, she's mine to do with as I please!
But, I digress.
I found the dinette fabric almost as soon as I walked in. It coordinates beautifully with the curtains and has that mod-retro look. But then I made the mistake, or the strategic decision, of "just looking around" and walked by the remnant bins. Now these are cardboard boxes placed on tables with a beautiful hodge-podge of cotton and cotton/poly folded pieces. What could be more fun? I found Michael Miller, Amy Butler, Alice Kennedy and Free Spirit. Yes, they were all hiding in those bins, a bit cramped but none the worse. Can you say Jackpot! I kept circling the table, coming back to the Michael Miller Posey Garden and then I found the other 2 pieces that coordinated. And wouldn't you know, just that morning I was sitting on my front porch, looking at the throw pillows and thinking I would have to recover them due to fading by the sun.
Done, done and done! And all the fabrics, yes even the uphostery, were $3.99 a yard.
Done, done and done! And all the fabrics, yes even the uphostery, were $3.99 a yard.

Purty, huh?
Monday, November 9, 2009
New Pleat-less Curtains for the Airstream
I love it when a job turns out to be easier than expected. It's been awhile since I've made curtains or drapes so I was facing this task with some trepidation. But I took time to think through the steps and the job was actually fun. It's all straight sewing so the difficult part is the measuring and cutting. And of course in the Airstream there are no 2 windows the same size, so I had to be very careful about making sure I was putting the right pieces together.
Here's what the curtains looked like before:

They weren't in terrible shape but had some water stains and just didn't suit me. I think the pleats are a little formal for a camping trailer but, it is an Airstream. If you notice, there are pleats along the top and bottom with the curtains being "hung" with plastic clips attached to a small piece of elastic which is tacked to the curtain.

The plastic clip is then threaded into an aluminum rail. And, there are 2 different types of clips to fit 2 different types of rail. Sheesh!
Anyway, here are the basic steps:
Needed items: curtain fabric, lining fabric (I used Roc-Lon Special Suede), buckram, clips

My favorite cutting tools
Measurements-I measured the finished size of the curtain. For the outer fabric I added 1 inch to the sides for a seam allowance and hem. I also added 1/2 inch to the top and bottom. For the lining I used the finished size measurement plus 1/4 inch seam allowance for the sides and added 3 inches to the top and bottom. This was due to a special circumstance with my fabric. Because the fabric is so sheer, the white buckram used at the top and bottom showed through so I made both hems of the lining fabric long enough to cover the buckram. Otherwise I would have added only 1/2 inch top and bottom.

My measurements-I'm very visual so I like to make a drawing with the measurements.
Pin outer fabric and lining right sides together.

Remember, due to the side hems there will be "excess" fabric.

Seam the sides, turn right side out and press.

There's that magically appearing hem
Press under top and bottom hems on outer fabric and lining.

Insert buckram between the layers,

Sew hems and then create the heading by seaming 3 inches below the hem.

And there you have it, a curtain.
Next post I'll put on the clips (hopefully getting the right clips on the right curtains : /) and show some finished photos.
Friday, November 6, 2009
Creating memories

My friend Michelle, at Figment of My Cogitation, has written yet another great post. This one is entitled The Value of Doing Stuff and will twang a heartstring with all of us DIYers, crafters, creators, artists.
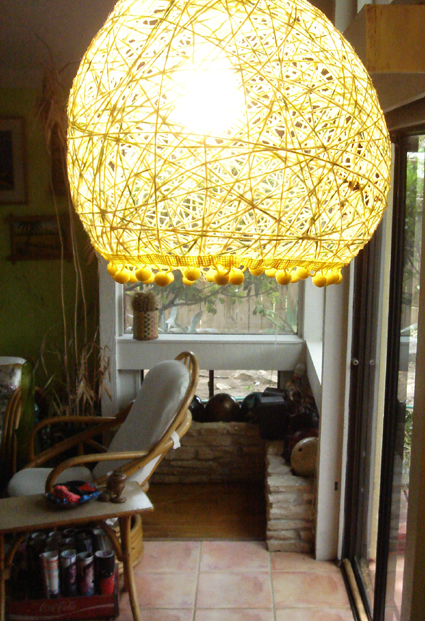
My mother belonged to a Homemaker's Club made up of women in the neighborhood, most within walking distance because those were the days of one-car families. The ladies, probably 6-10 of them, would rotate being hostess. At the meetings they would have a ...meeting and then do a craft project. I remember wrapping string dipped in glue around balloons to make string ball lights (except I don't think ours ever had an actual light) and folding data punch cards (remember those?) into cones and attaching them to cardboard. When sprayed green it made quite the festive wreath.
The best part however, was the lunch. There was always some cool thing that Mom never made at home and dessert! Yes, dessert at lunch. Will wonders never cease?
.
Wednesday, November 4, 2009
In Other News...
Airstream Redo-

I think I have all the stuff needed to start the curtains. But like any DIY project, there is always that one thing you forget without which the project comes to a complete standstill. What will it be this time?
Tiny House-
Still percolating... But check out this one:

Post Home Tour Home Tour: Dining...Area
Yes, area, in the middle of a larger room. But not that large, the kitchen, DR, LR space is approximately 14 x 28. Small by most standards.
In order to trick the eye a bit and make it appear larger, I did a couple of things:
- windows with views on 3 walls, to carry line-of-sight beyond the walls, and
- very high ceilings.
The high ceilings only work to create volume if the eye is drawn upward. This won't happen if everything on the walls ends at the height of 8 feet. I had this problem, so I had to fix it.
Here is a photo of the dining area window before:

and after:


It really makes quite a difference. And yes, that is all done with clay paint on the earthen plaster. I drew a half-circle above the window and taped off the design. I loved doing this project.
I have some other little changes in this area which I'll share in a later post.
Tuesday, October 27, 2009
Post Home Tour Home Tour: MBR, continued.
This makeover of my bedroom got me out of my earthtone, neutral doldrums. Not that I will never use them again, just not everywhere. I love this look from Fine Living.

But right now, I am so loving the blue! (Update: the paint color in the shower is Behr River Rock)
As I mentioned in a previous post, I finally have a headboard. I read in bed and wanted something that would be comfortable and sturdy to lean against. So, one day I walked into Savers and saw this headboard:

Let's see how it stacked up next to my wants list:
Sturdy-solid wood, (weighs a ton)Queen-size-tale of the trusty tape, 60 inchesPadded-it's ugly mauve vinyl, but that's easy to fixTall enough to have some presence-43 inches (really, never go anywhere without a tape measure)Price- $9.99, need I say more?
It seemed to meet my criteria, a no-brainer, right? So what did I do? Talked myself out of it and walked out of the store! "It's too heavy, it won't fit in my car, maybe it's not tall enough, blah, blah, blah."
By the time I got home, I had to have it! So, I returned the next day. As I pulled up to the store I started to get that fast breathing, heart pumping moment of trepidation. What if someone got it? All you thrifters know that you NEVER walk out of the store expecting something you like to be there when you return. It's a law of the universe. But as I got to the back of the store, I spied it, it was still there! Yes, take that, Universe! A quick call to the boys who were just getting out of class (older one drives and old SUV with lots of room) and my moving truck was on its way. So I took my station leaning against the headboard until they arrived, which was about 20 minutes. You can see a lot of interesting things in Savers in 20 minutes of just standing.
After a little sanding, a couple of coats of Rum Raisin with a little black glaze and new fabric, this is the headboard.

I recovered the throw pillows I had (confession: the 2 in front aren't even finished at the bottom yet : ) H/T to The Nester) and I'm quite happy with the finished product. My grown-up bed!


Here's my window seat.

And a calm spot.

Namaste'
Friday, October 23, 2009
Post Home Tour Home Tour: Master Bedroom
Take my word for it...it was BORRRR 'ing (in my best JoAnne Worley voice. What? Who's Joanne Worley? Ohhhhh, never mind.) And by boring, I mean that only in a decorative sense. I cast no aspersions.
Again, I have no before photos but trust me, it was just a thrown together room that never looked terrible but never looked good. You've probably had, or have, similar rooms. All it takes is a little inspiration, a little thought, a bit of time and only a little money, and you can have something that makes you feel good every time you walk through the door.

I've had this night stand for several years and love it. I drug it home from some thrift store. And I do mean drug because it's solid wood, and I mean solid, and very heavy. I painted it a rich, dark brown (it was so long ago, I don't remember the paint name) with a black glaze. With a new brushed silver handle for the drawer it's now a sleek, contemporary piece.

My mother-in-law (83 years young) made the stained glass frame. It holds a flower done with Rust-Oleum aluminum spraypaint on a piece of black cardboard.
The Big Ben clock is another thrift store find from several years ago. If I remember correctly, it was all of 25 cents.

Another thrift store piece I've had for quite a while (If I were a better photog, I would probably camouflage the plugs and cords.) I bought this because I liked clean lines, it is solid oak and it had room for books, etc. Since I've had it, it's been various colors but is now painted in the same way as the previous stand.
The 2 pieces on the wall are trivets which were a hideous navy blue. I loved the lacy look of them and they were only .99! I brought them home, roughed them up with some sand paper as they had quite a glossy finish, and sprayed them with Rust-Oleum Lake Blue. I then found some cardboard pieces that fit the back of the trivets which got a new look with the RO aluminum paint. I then called them wall art and hung them on the wall.
See the fake orchids on the left-GONE! Sorry you had to see that.

I do occassionally buy things new! I found these lamps on the clearance rack at Target. Some crazy price like $7.48 apiece. I had just recently moved my bedroom lampsto the sofa table in the living room and since my bedroom was becoming a more grown-up room (with a headboard and everything) I thought these classic shapes would do the trick. However, I knew the color wouldn't, as they would be sitting on tables very much the same color.
What's a girl to do?
Spraypaint, of course!
and a little black glaze.
The shades were a happy find at Ross.

I found this 24in. wooden shelf at Savers for $2.99. Funny thing, it was about the same blue as the comforter in this room. So, I painted it brown. I do know the color of this one: RO Dark Brown. The photos are of my babies who are now grown. The angel is sucking its thumb and actually holding a small piece of a "blankee."
This little shelf is just a reminder of how quickly time passes and once those moments are gone, they are gone forever.
More to come...
Tuesday, October 20, 2009
Ode to a Shower: Canelo
One of my new favorite blogs is hosting a blog party.

This woman would understand my need to pick up rusty junk in the desert, even brake drums and gears!
This woman would understand my need to pick up rusty junk in the desert, even brake drums and gears!
The shower needed help.
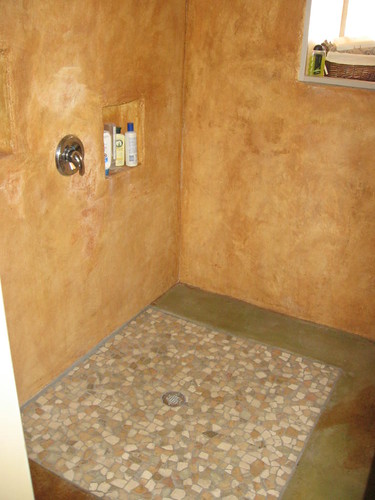
This house was built to be our retirement house. That is to say, we mean to stay until they carry us out feet first. With that goal in mind, we had to think about things that would make it possible to continue to live here with physical impairments. To that end we built a large shower, large as in, approximately 5x6 with no threshold, so as to easily accommodate a wheelchair and shower chair.
The walls were originally finished with lime plaster, sort of like tadelakt. My mistake (hey, it was my first time), I used sand that was too large grained making the walls difficult to clean. So we had it tiled with a neutral large format tile with very small grout lines (easier to clean). Once the tile was up it became clear that the wall color above the tile needed to be changed. I wrestled with that for about 3 weeks and tried several different colors. I finally settled on a nice soft blue which makes the walls seem like sky. The color also coordinates with my new bedroom colors.
Seeing that expanse of blue got my creative juices going. Those walls were calling out for a tree and birds, so I used a gray-brown Oops that I've had around forever to paint tree and bird silhouettes. That made it seem even more like sky. It's very soothing place now and my favorite room in the house.


But this is still my favorite shower, ever.
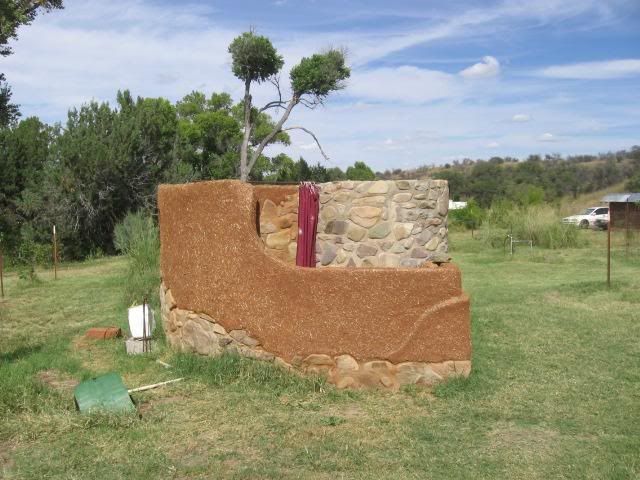
Cob-Stone Shower Canelo Project
Monday, October 19, 2009
Partyin' With My Peeps!

I don't usually do this, but they seem like nice people. You know, got to a party where you don't really know anyone and you wonder if you will have anything in common, to talk about. Well, this party is full of people a lot like me. Paint-stained fingernails, maybe some paint in the hair, always carrying a tape measure, comfy shoes, an outfit that's seen better days and a big bag to carry lunch, water, wallet and TREASURES. They're Flea Marketeers and they're having a party over at Flea Market Style, join us!
I linked to my great lamp find that I like more and more each day!
Thursday, October 15, 2009
A milestone of sustainability? Hmmmm
It's a quirky little community full of interesting people and characters. I think I fit in the character category. I can look out my window and see hummingbirds and butterflies and if the windows are open, listen to birds sing and coyotes howl. I know many of my neighbors and have people I could call on for assistance, or to borrow a tool or a cup of flour (organic whole wheat, of course : ) )
I've never regretted moving here.
CivanoSlideshow
Tuesday, October 13, 2009
Are You Going to Scarborough Fair?
Parsley, Kale, Bananas and Pears...


And I did paint a lawn chair...or two. These chairs have been in the family for about 20 years and while not exactly heirlooms, they are still serviceable chairs. I bought them as Christmas gifts for Mom and Dad to use here in their Tucson home, knowing that Mom could never sit for long in a chair that didn't rock. I have inherited that proclivity and when my parents could no longer come here for the winters and we sold their place, I laid claim to the chairs. They were showing their age so I thought some paint was in order. When is some paint not in order?

Here's a before and after. As I looked at all that blue, it came to me that I needed to add something. How about a big mod flower? I used some cheap adhesive-backed shelf paper to cut out a stencil.

If you're following along at home, remember that your stencil is the negative space of the flower. It only took me one oopsy to figure that out. I applied the stencil to the chair and sprayed away. I then cut a round stencil for the center and free-handed the accents.

Groovy, huh?
I must say that I like Rust-O-Leum paint much better than the other brands out there. I bought another type for the green chair and it just didn't cover like Rust-O-Leum.

I have many more projects in the works. Home tour is T- minus 3 days!
Subscribe to:
Posts (Atom)


